Lettori fissi

domenica 3 agosto 2014

Riciclo organizer

Eccomi qua  di ritorno , con un nuovo post tutto particolare ...
Qualche giorno fa mi ero messa a guardare gli organizer per mettere in ordine le carte scrap , e cosi mi sono decisa a crearne uno con modello realizzato da me :..
Per la realizzazione ho utilizzato del cartone ondulato ( quello degli scatoloni per imballaggi  va benissimo ) ,scotch di carta , acrilico nero , cartoncino colorato da 200 gr in su ; carta scrap e vari abbellimenti a piacere ... ecco quello  che è uscito fuori ...

Here I am back with a new post very special ...
A few days ago I had started to watch the organizer to sort the cards scraps, and so I decided to create one with a model made by me ..
For the construction I used corrugated cardboard (one of the cartons for packaging is fine), masking tape, black acrylic, colored cardboard up to 200 grams; scrap paper and various embellishments as you like ... that's what came out ...


Spero  che il mio post  vi sia piaciuto !! Ci vediamo al px !!

Hug Serena !!

martedì 15 luglio 2014

From the paper bag to the card---------Dal sacchetto di carta alla card

Ciao a tutti come state ?? 
Come è il tempo   da voi ????
 Ma siamo in estate  a luglio , o ad ottobre ??!!
Qui da me la  mattina un po di sole , il pomeriggio.... pioggia :( che noiaaaaaa !!


In questi giorni  mi è balenata in mente un idea strana .... da un sacchetto di carta .. un card !!!!! 

Infatti è nata la mia piccola card , ve la presento :
Ho preso il sacchetto di carta  , ho tagliato la parte dentata ed ho piegato a misura il sacchetto come mi interessava a me ...
 La copertina .. ho utilizzato un cartoncino grigio e uno bianco per fare lo sfondo ...
carta scrap verde , sopra ho riportato  un rettangolino con della carta scrap raffigurante delle farfalle , da parte ho incollato un fiore e sotto ho messo delle piccole punchate di fiori con sopra delle mezze perle .. 
La scritta lo fatta al pc ..


Al suo interno  , da una parte ho utilizzato un timbro di scritte e poi le ho embossate con la polverina bianca ed ho attaccato un fiore , riprendendo  i colori  delle carte che sono state utilizzate  per creare la card .. 
Dalla parte opposta ho attaccato un cartoncino bianco  e con della carta scrap ho creato una taschina nella quale ci si può inserire la lettera o il pensiero a cui vogliamo destinarla .. 


dietro ho fatto un rettangolino , nel quale  ho attaccato la scritta " fatto a mano "


Eccomi qua ... spero che il post sia di vostro gradimento , che vi sia piaciuto e che vi sia di ispirazione , per nuove creazioni !!

Baci Serena !!! :)

English

How is the weather by you?? 
  But we are in summer in July or October?! 
Here, a bit of me in the morning sun, afternoon rain ....: (what a bore! 
These days I floated in the mind a strange idea .... from a paper bag .. a card!! 
It was born my little card, I will present: 
I took the paper bag, I cut the notched side and I bent to fit the bag as I was interested in me ... 
  The cover .. I used a gray card and a white background to make it ... 
green scrap paper, I reported on a rectangle with a scrap of paper depicting butterflies by I glued a flower and I put it under punchate of small flowers with over half of pearls .. 
The writing made ​​it to the pc .. 
Inside, on the one hand, I used a stamp of written and then I-embossed with white powder and stuck a flower, taking the colors of the cards that have been used to create the card .. 
On the other side I attached a white cardboard and paper scraps I created a pocket in which you can enter the letter or the thought that we want to direct it ..
I made a rectangle behind, which I attached the word "handmade" 
Here I am ... I hope that the post is to your liking, you enjoyed it and that will be an inspiration for new creations! 

Serena Kisses! :)

mercoledì 2 luglio 2014

Review - Recensione

Ciao a tutti , oggi volevo fare un post dedicato ad una persona molto speciale , con la quale ho avuto  la possibilità di effettuare con lei uno SWAP indetto dal gruppo di fb Arte a tutto tondo....e quale modo migliore se non recensire i suoi lavori nel mio blog ?
L'artista , la grande artigiana  di cui vi parlerò è Giovanna De Bernardo ....
Allora ... Giovanna è una persona gentilissima e simpaticissima ,lei lavora la Porcellana di Capodimonte , sono molti anni che ha imparato a lavorarla  e devo dire  che è bravissima , realizza degli oggetti veramente preziosi e stupendi anche per la loro semplicità .Vi mostro i lavori che Giovanna  mi ha regalato sono meravigliosi:

Andate a visitarla nella sua pagina di facebook questo è il link :Le Creazioni di Giovanna Porcellane, li troverete tantissimi suoi lavori , uno più bello di un altro !!!!
Giusto che smemorata che sono !!! Giovanna  possiede anche un suo canale su you tube , questo è il link :Giovanna De Bernardo, andate e iscrivetevi !!!
ENGLISH

Hello everyone, today I wanted to do a post dedicated to a very special person with whom I have had the opportunity to perform with her group organized by a SWAP fb Art in the round .... and what better way if you do not review the his work in my blog? 
The artist, the great artisan of which I speak is Giovanna De Bernardo .... 
So ... Giovanna is a very nice and kind person, she works Capodimonte Porcelain, many years he has learned to work it and I must say it is very good, makes objects really precious and beautiful for their simplicity.'ll Show you the work that Joan gave me are wonderful: 


Go visit his facebook page this is the link: https://www.facebook.com/CreazionidiGiovanna/timelineyou'll find many of his works, one more beautiful than another!! 
Just that they are forgetful! Joan also has its own channel on you tube, this is the link: Giovanna De Bernardo, go and sign up!

lunedì 23 giugno 2014

envelopes that passion ... :) buste... che passione:)

eccomi qua .. propio vero , era tanto che non scrivevo nel blog , scusatemi ma aimè ho avuto dei problemi di salute che mi hanno costretto a tralasciare le mie passioni .... adesso sto meglio e quindi bando alle ciance , vi mostro dei lavori che realizzato  sono due mini album , il primo dei toni sull arancione e l altro  sui toni del rosa ...vi lascio alle foto :)

Per realizzare questi album ho utilizzato delle classiche buste da lettera , io ho utilizzato quelle che possedevo , ma per realizzare questi tipi di album potete usare qualsiasi busta che piu vi aggrada ,  come carte ho utilizzato delle carte della rayrer , che aimè non ricordo il nome , più ho abbinato le carte della collezione DCW Flower , almeno spero che si scrivi cosi ... :P


Per fare la copertina ho usato del cartoncino riciclato di scatole di biscotti , per la copertura ho scelto la carta di cotone dai toni arancioni ... 

Spero vi sia piaciuto ci vediamo al px post ::: 

 baci Serena 


ENGLISH

here I am .. propio true, it was so long since I wrote in my blog, sorry but alas I had some health problems that have forced me to miss my passions .... I'm better now and then without further ado, I show you the work that are made ​​of two mini albums, the first tone on orange and other shades of pink ... I leave you with photos :) 

To achieve these albums I used the classic envelopes, I used what I possessed, but to make these types of albums you can use any envelope that most suits you best, I've used the cards as cards of rayrer, which alas can not remember the name plus I paired the papers in the collection DCW Flower, at least I hope you write so ...: P 

To make the cover I used the recycled cardboard boxes of cookies, I chose to cover the cotton paper from orange tones ... 


I hope you enjoyed px see you at the post ::: 

  Serena kisses

venerdì 16 maggio 2014

Piccoli Folletti ---small Flyers

Eccomi qua ... nuovo post ..  di cosa vi parlo... mah si... dai sto scherzando !!!
Ecco le mie nuove  piccole opere con paste polimeriche ( Fimo e Cernit )
Le piccole follette !! Sono adorabili , piccole e le potete portare ovunque voi volete , sono stata realizzate per essere portachiavi , delle collane , bomboniere  e tanto altro !!!!
Vi lascio alle foto !!!


Lei è Mimi , la nuova arrivata dai toni verdi e fucsia .....


English

Here I am ... new post .. what I speak ... well ... come on you kidding! 
Here are my new small works with polymer clay (Fimo and Cernit) 
Small follette! They are adorable, small and you can take it anywhere you want, I was made ​​to be key chains, necklaces, wedding favors and much more!! 
I leave you to the photos!

Hug !! Serena 

lunedì 12 maggio 2014

Folletti!!!!!!----New Entry!!!!-------Leprechauns!! ---- New Entry!!

Di nuovo qua !!! E'  con immenso piacere che vi presento le new entry dei folletti ....
Eccoli :la prima si chiama Cucciolina , la seconda si chiama Girabella

Per crearle ho utilizzato due tipi di paste polimeriche : Fimo Soft e Cernit ..


English
Back here! And 'with great pleasure that I present to you the new entry of the elves .... 
Here they are: the first is called cucciolina, the second is called Girabella 

To create them I used two types of polymer clay: Fimo Soft and Cernit ..

Mini Album Vintage------Vintage Mini Album

Eccomi qua... voglio farvi vedere una mia ultima creazione .... un mini album realizzato con cartoncino di riciclo e una busta del pane ....,mi sono ispirata ad un video visto su youtube di una ragazza,llei aveva utilizzato del cartoncino , io invece ho voluto osare ed utilizzare dei materiali diversi .....ho ricoperto il cartoncino di base con carta scrap , dopo di chè ho piegato la busta del pane ed ho attaccato le carte che avevo gia preparato prima prendendo le misure , ho sporcato i bordi con un tampone marrone e la chiusura lo ideata molto semplice ; con un nastrino verde il quale si intonava bene con la carta con cui ho rivestito il cartoncino , una scritta e una piccola girandola  come decorazione fatta da me ,  vi lascio alle foto :)


English


Here I am ... I want to show you my latest creation .... a mini album made with recycled cardboard and a bag of bread ...., I was inspired to have seen a video on youtube of a girl, had used Llei of the card, but I've wanted to be daring and use of different materials ..... I covered the cardboard base with paper scraps, after which I folded the bag of bread and stuck the cards that I had already prepared before taking action , I dirtied the edges with a buffer brown and closing the designed very simple; with a green ribbon which is well matched with the paper with which I covered the cardboard, one written and one small pinwheel as a decoration made ​​by me, I leave you with photos :)

domenica 4 maggio 2014

Folletti e Confezioni --Goblins and Packaging

Eccomi qua .. oggi ho consegnato dei folletti con relative scatoline  , le quali mi erano state chieste per regalarle ad una ragazza che inaugurava un negozio proprio oggi .. vi lascio alle foto ...


English

Here I am today .. I handed goblins with relative boxes, which I had been asked to give her a girl who ushered in a store right now .. I leave you with the photos ...


Hugs Serena !:)

martedì 29 aprile 2014

Buste da lettera .. che passione .....!!! __Envelopes .. that passion .....!

Ciao a tutti !!..
E' si .. era un pò che mancavo dal blog .....
Torno con un nuovo post dedicato alle buste da lettera ..  tempo fa guardando su youtube   trovai un video davvero interessante , un mini album realizzato totalmente con 4 buste da lettera ..
Così ho provato anche io  a farli e devo dire che è molto semplice  e molto carino  il lavoro che si ottiene .. un bel mini album a cascata ..
Vi lascio alle foto  cosi potete vedere quello che ho combinato !!


English

Hello to all! ..
And '.. it was a bit that was missing from the blog .....
I'll be back with a new post dedicated to the envelopes .. long ago watching a video on youtube I found really interesting, a mini album made ​​entirely with 4 envelopes ..
So I tried to get them and I must say it is very simple and very nice work .. that you get a nice mini album cascading ..
I leave you to the photos so you can see what I've done!


Hug Serena !!:))

lunedì 24 marzo 2014

Fiera Fantasy e Hobby primaverile a Genova

Ciao a tutti .. Eccomi qua , finalmente riesco a fare un post nel blog , oggi vi volevo parlare della fiera Fantasy e Hobby  di Genova a cui ho partecipato una settimana  e mezzo fa , con due amiche ... Devo dire come fiera è molto bella , mi è piaciuta molto anche perchè c'erano vari stand ( tre piani ) menomale c'erano gli ascensori ! 
:P 
Aimè ...  l'unica cosa che non mi è piaciuto tanto  è l'indicazione per arrivarci , purtroppo non ci sono indicazioni quando arrivi dentro genova , sappiamo soltanto dal sito che si svolge nei magazzini del cotone... 
Ma non preoccupatevi  chi volesse andare a visitarla in autunno ci  vada perchè vale propio la pena andare a vederla , seguite le indicazioni per l'acquario di genova  , parcheggiare presso il parcheggio dell' acquario , andate avanti a piedi  max 10 minuti e troverete lo stabile dei magazzini del cotone sulla vostra dx il quale  è situato proprio li al porto ..
Ho trovato vari stand di scrapbooking , ma anche di cucito creativo , bijoux , uncinetto , cake design e tanti altri ancora ... come potete immaginare  non sono tornata a mani vuote :)) 
vi lascio alle immagini degli acquisti che ho fatto .. 


Mi auguro di non avervi annoiato tanto , ci sentiamo al px post !!

Baci Sery !!


martedì 11 marzo 2014

Wedding Cake - Torta Nuziale

Sera a tutti , volevo farvi vedere una mia ultima creazione  con le paste polimeriche , una gradevole Torta Nuziale ,  può essere usata anche come bomboniera  ..
Con questa creazione partecipo al challenge di marzo  del gruppo Creando con Amore di facebook :
https://www.facebook.com/groups/247198242043836


Evening everyone, I wanted to show you my latest creation with polymer clay, a lovely Wedding cake, can also be used as wedding favors .. 
With this challenge I participate in the creation of the group in March creating with love facebook:

giovedì 6 marzo 2014

The book fantasy

Ciao a tutti , ho creato una  tag molto carina ,.... era un pò che non le  eseguivo ..
Allora ho preso del cartoncino base  chiaro  e ciò ricavato la tag a mano , dopo di che ho sporcato i bordi con il Distress ink (brushed corduroy) .
Dopo ho creato con un cartoncino nero lo sfondo lasciando sempre uno spazio per intravedere i bordi della tag, in quest'ultimo ho  effettuato l'embossing a caldo con polvere oro ,, dopo ho attaccato la carta scrap  sopra di esso ..
Ho colorato poi un timbro con gli acquarelli  , la quale rappresenta una ragazza seduta intenta a leggere i suoi libri preferiti ..
Infatti da qui nasce il titolo della tag : THE BOOK FANTASY .
Ho finito di decorarla  con una fustella tipo fiori rampicanti  regalatami da una mia amica .. ed ho  attaccato  dei fiori  in 3d con sopra degli strass per dare luce ..
La scritta lo effettuata  con la dymo  .. :)
Spero  che il mio lavoro vi sia piaciuto ... e che dire .. al prossimo post .. !!!

Baci Serena 


Hello everyone, I have created a very pretty tag, .... it was a while that I performed the .. 
Then I took the cardboard base and clear what made ​​the tag by hand, after which I smeared the edges with Distress Ink (Brushed Corduroy). 
After I created a card with black background always leaving space for a glimpse of the edges of the tag, in the latter I made the hot-embossing with gold dust, after I stuck the scrap paper on top of it .. 
I then colored with watercolors a stamp, which is a busy girl sitting reading his favorite books .. 
In fact, here comes the title of the tag: THE BOOK FANTASY. 
I finished decorating it with a punch type climbing flowers given to me by a friend of mine .. and I stuck the flowers in 3d with rhinestones to give the light of the above .. 
The writing done with the dymo .. :) 
I hope you enjoyed my work ... and what to say .. the next post ..!


Con questa tag partecipo hai seguenti Challenge :

 Timbroscrapmania      
Challenge #89 -Tags, Tags, Tags 

Storie di timbri, carta e,,
Challenge # 3 -Fiori 
http://storieditimbricartae.blogspot.it/                                       

Wrapping.....

Ciao a tutti , è proprio vero ... Marzo mese pazzo !  una volta è caldo , una volta è freddo e una volta  piove ..... :( ...
Comunque oggi  sono qua per parlarvi  di un modo simpatico per incartare un pacchetto , una busta ..  si chiama Wrapping .... Io  ho  preso una piccola busta di carta craft , per imbustare un piccolo pensierino , ho  creato una targhetta a mano , nella quale  ho scritto a mano happy birthday ed ho sporcato i bordi con il tampone blu ,sopra alla targhetta ho attaccato un nastrino azzurro ed alla attaccatura del nastro ho messo un fiore in 3d ..

Con questo lavoro partecipo alla 5° Sfida Ispirato da .. del blog :
http://amichediscrap.blogspot.it/


Hello everyone, it's true ... March crazy month! Once it is hot, once cold and once it rains .....: (...
However, today I am here to tell you about a nice way to wrap a package, an envelope is called .. Wrapping .... I took a small paper bag craft, for bagging a small gift, I created a label by hand, in the which I hand-written happy birthday and I dirtied edges with the blue pad, above the plate I attached a blue ribbon and attach to the ribbon I put a flower in 3d ..

martedì 25 febbraio 2014

Easel card

Ciao bellissima gente , sembra che oggi ciò preso gusto con i post , quando nulla quando tanti :p...
 Vi presento una mia Easel card  ...Ho preso dei cartoncini  blu , della carta fantasia abbinata , come decorazione ho utilizzato una rosa di carta fatta da me , dei cuoricini , un cerchio piccolo , un bel nastro blu brillante ed una bellissima timbrata della  Magnolia .. vi è sembrato che ci stasse bene ..

con questa easel card partecipo alla 5° Sfida card del gruppo :http://amichediscrap.blogspot.it/


Hello beautiful people, it seems that today it acquired a taste with the post, when nothing when so many: p ... 
  I present to you my Easel card ... I took the blue cardstock, paper fantasy combined, as decoration I used a pink paper made ​​by me, little hearts, a small circle, a beautiful bright blue ribbon and a beautiful stamped the Magnolia there .. it seemed that there Stasse well .. with this easel card I participate in the 5th Challenge card of the group: http://amichediscrap.blogspot.it/

Layouts

Ciao a tutti eccomi di nuovo con un nuovo post , da me è un freddo !! mamma mia ..  ma almeno le giornate si stanno allungando ...
Con questo post volevo farvi vedere il primo layout !!! Ho preso un cartoncino 20 x 20 cm , ho timbrato delle farfalle , ho utilizzato uno washi colorato , come decorazione ho usato dei bottoni rosa fatti da me con le paste polimeriche , la scritta lo effettuata con la dymo ...
Con questo Layout partecipo  alla sfida LO#5  del blog :http://amichediscrap.blogspot.it/


English

Hello everyone I'm back with a new post from me is a cold! my mom .. but at least the days are getting longer ...
With this post I wanted to show the first layout! I took a piece of cardboard 20 x 20 cm, I stamped the butterflies, I used a colorful washi, I used it as a decoration of pink buttons made ​​by me with polymer clay, the message it carried out with the dymo ...
With this layout I participate in the challenge LO # 5 Blog: http://amichediscrap.blogspot.it/

mercoledì 19 febbraio 2014

Folletti-Fairies

Ciao , come state ? Ma io non mi posso lamentare, i soliti acciacchi , ma per ora tutto ok ! Oggi volevo presentarvi una nuova folletta ... il suo nome é : FIAMMETTA la folletta del fuoco ...

Fimo usato per il cappello e  le scarpe

_Fimo classic :num -23
_Fimo soft : num_24
_Fimo soft :num _0

Fimo usato per i capelli  e per il corpo
_Fimo classic : num_23
_Fimo soft :num _16

Fimo usato per viso , orecchie e mani

_Fimo classic : num _43

Fimo usato per occhi

_Fimo nero e fimo bianco


ENGLISH

Hello, how are you? But I can not really complain, the usual aches and pains, but for now everything is ok! Today I wanted to show you a new folletta ... his name is: FIAMMETTA folletta the fire ... 

Fimo used for the hat and shoes 

_Fimo Classic: num -23 
_Fimo Soft: num_24 
_Fimo Soft: num _0 

Fimo used for hair and body 
_Fimo Classic: num_23 
_Fimo Soft: num _16 

Fimo used for the face, ears and hands 

_Fimo Classic: No. _43 

Fimo used for eyes 

_Fimo Black and white polymer clay

domenica 16 febbraio 2014

Folletti- Fairies

Come avevo detto nel post scorso avrei creato  foleltte sorelline per la prima  ed ecco :........

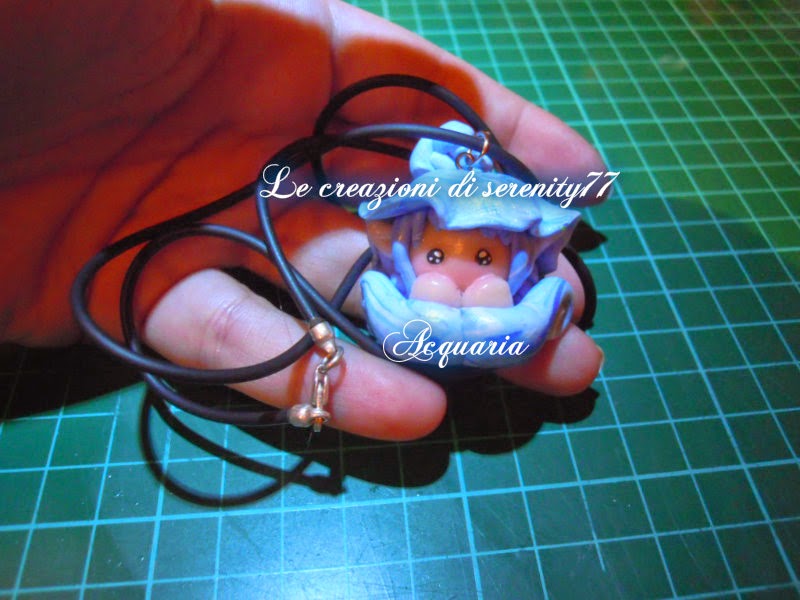
ACQUARIA ! La folletta dell' acqua !!!

Fimo usato per il cappello e le scarpe :

_Fimo bianco : (num :0)
_Fimo blu : (num: 37)
_Fimo effect aqua : (num :305)


Fimo usato per i capelli e per il corpo :

_ Fimo bianco :( num:0)
_Fimo blu :( num :37)

Fimo usato per il viso , le mani e le orecchie
_ Fimo pelle chiara (num:43)

Fimo per gli occhi :
_Fimo nero
_Fimo bianco


English


As I said in the last post I created foleltte sisters for the first and here: ........

ACQUARIA! The folletta of 'water!

Fimo used for the hat and shoes:

_Fimo White: (num: 0)
_Fimo Blue: (number: 37)
_Fimo Aqua effect: (number: 305)


Fimo used for the hair and body:

_ Fimo white: (num: 0)
_Fimo Blue: (number: 37)

Fimo used for the face, hands and ears
_ Fimo clear skin (number: 43)

Fimo eyes:
_Fimo black
_Fimo white

giovedì 13 febbraio 2014

Folletti-Fairies

Ciao a tutti , qualche giorno fa  mi era venuta voglia di creare qualche folletto o fatina  con il fimo e così è nata ...... TERRINA , la folletta della terra :)

Materiali usati per il cappello e le scarpe :

- Fimo viola ( num:61)
-Fimo rosso ( num:24)
-Fimo giallo (num:16)
-Fimo bianco  (numero 0)

Materiali usati per i capelli e il corpo :

- Fimo rosso (num: 24)
-Fimo giallo ( num: 16)
- Fimo bianco ( num: 0)

Materiale usato per viso, orecchie e mani :

-Fimo pelle chiara ( num:43)
altrimenti Cernit : pelle chiara

-Fimo nero e Fimo bianco per gli occhi


English

Hello everyone, a few days ago I got the desire to create some pixie or fairy with polymer clay and so was born ...... TERRINA, the folletta of the earth :) 

Materials used for the hat and shoes: 

- Fimo purple (number: 61) 
Fimo-red (number: 24) 
Fimo-yellow (number: 16) 
Fimo-white (number 0) 

Materials used for the hair and body: 

- Fimo red (number: 24) 
Fimo-yellow (number: 16) 
- Fimo white (num: 0) 

Material used for the face, ears and hands: 

Fimo-pale skin (number: 43) 
otherwise Cernit: clear skin 

Fimo Fimo-black and white for the eyes

lunedì 10 febbraio 2014

Nastri ed Embossing--/Ribbons and Embossing

ciao a tutti .. in questi giorni mi sono messa a creare un po di cosuccie   intanto vi lascio questa mia card ,ho usato un nastrino in tinta con la carta che avevo scelto , poi ho embossato a caldo due cartoncini  incastrandoli fra di loro : il tutto adornato da una dolce gorjuss e fiori intorno..


English

hello to all .. these days I started to create a bit of this little things in the meantime I leave you my card, I used a ribbon to match the paper that I had chosen, I then heat embossed interlocking them two cards to one another, all adorned with a sweet gorjuss and flowers around ..


Con questa card partecipo al 2° Challenge  di Storie di timbri,carta e,,


lunedì 3 febbraio 2014

Card di San Valentino

Ciao eccomi con un nuovo progetto , siamo entrati nel periodo di San Valentino :) :) èèèèèèèèèèè....... l'amour , l'amour ...
Ho preparato questa card :


Ho usato una base neutra  , un color grigio chiaro , mi piaceva l'abbinamento :) ; dopo di che ho utilizzato delle carte della TOGA  collezione cupido ,con uno sfondo bianco ;ho tutto sporcato i bordi con tampone sul rosso ; la scritta è stata fatta al computer scegliendo una scritta romantica ed elegante ... spero che la card vi sia piaciuta ,  grazie  a tutti  alla prossima ! 

English

Hello here I am with a new project, we have entered the period of Valentine's Day :) :) ....... eeeeeeeeeee l'amour, l'amour ...
I used a neutral base, a light gray color, I liked the combination :), after which I used the papers of the TOGA collection cupid with a white background, I have all soiled pad on the edges with red, the writing was made to the computer by choosing a writing romantic and elegant ... I hope you enjoyed the card, thank you all next time!

sabato 1 febbraio 2014

1° Challenge ANYTHIG GOES gruppo fb Arte a tutto Tondo

 Ciao a tutti , da oggi parte  il primo challenge del gruppo di facebook Arte a tutto tondo  di cui faccio parte del DT !!!
Questa è la mia creazione un quadretto in decoupage raffigurante l'inverno , passate nel gruppo e PARTECIPATEEEE !!!

Baci Serena

English

Hello everyone, today part of the first challenge of the facebook group Art in the round of which I am part of the DT! 
This is my creation in decoupage a picture depicting the winter, go to the group and PARTECIPATEEEE!


Hug Serena

venerdì 24 gennaio 2014

mercoledì 22 gennaio 2014

dolcetti e bottoni


Ciao a tutti , mamma sto tempo , mette una tristezza ...  da me  sta piovendo .. eh vabbe lo passato a creare :)  ( come al solito , non ci so stare ferma )  qualche giorno fa mi hanno commissionato dei lavoretti in pasta polimerica , dei dolcetti e bottoni .. vi mostro  quello ho creato ...


Allora .. per i bottoni rosa ho utilizzato il fimo effect quarzo rosa , da un bellissimo effetto perlato !!

Questi bottoni li ho chiamati cioccomenta !qui ho usato il fimo color cioccolato  e quello menta , li ho uniti insieme e questo è l'effetto , danno l'idea di biscotti da mangiare !!


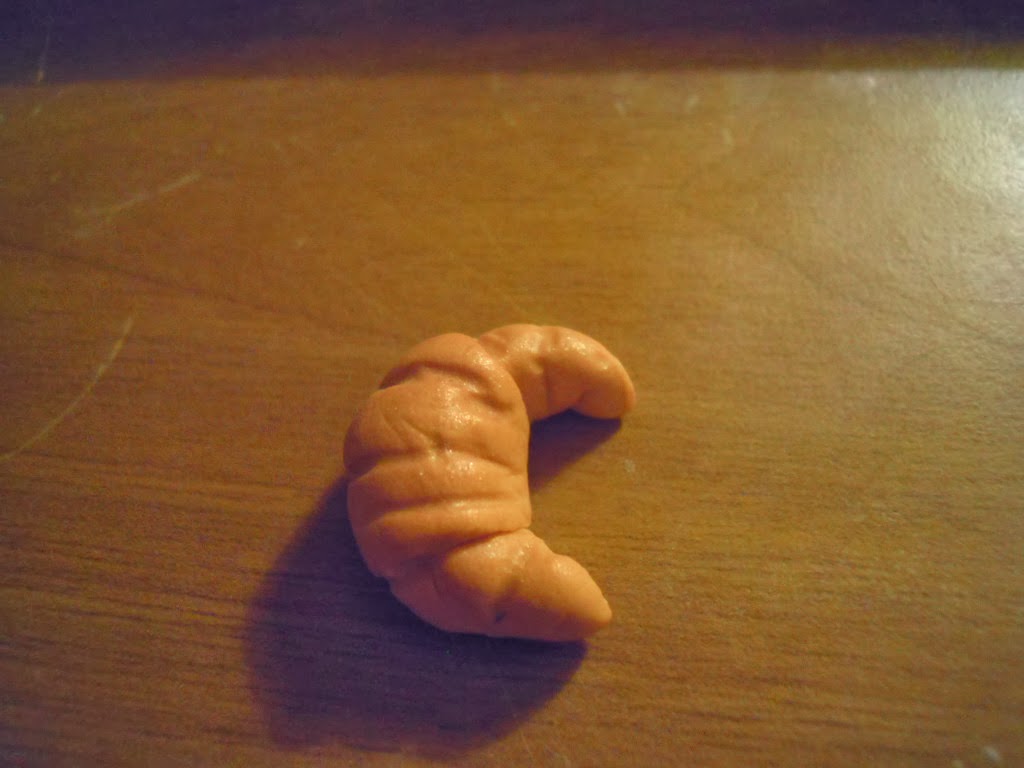
ecco il croissant !! qui ho usato il fimo cognac  e prima di metterlo in forno lo colorato con ombretto color caramello ..
Caramelle con fimo rosso indiano , bianco , aqua e quarzo rosa !! Deliziosi !!!


Effetto particolare con fimo bianco, verde e giallo ...:)

Ecco i dolcetti , viene voglia di mangiarli !!

Mi sono divertita un sacco a farli , sono ultra piccoli  , per chi fosse interessato , mi può contattare tramite email o lasciandomi un messaggio sulla mia pagina facebook !!


BACI SERENA :)

ENGLISH

Hello everyone, I'm mom time, it puts a sad ... to me it's raining .. huh Oh well the past to create :) (as usual, we do not know to stand still) a few days ago I was commissioned chores in polymer clay, sweets and buttons .. I show you what I created ...


So .. for the pink buttons I used Fimo effect rose quartz, a beautiful pearl effect!

These buttons I called them cioccomenta! Here I used polymer clay chocolate and the mint, I joined them together and this is the effect, give the idea of ​​cookies to eat!

here's the croissant! here I used polymer clay and cognac before putting it in the oven with colorful eyeshadow caramel ..

Candy with fimo Indian red, white, aqua and rose quartz! Delicious!

Particular effect with polymer clay white, green and yellow ... :)

Here are the cupcakes, you want to eat them!

I have a lot of fun to make them, are ultra small, for those interested, can contact me through email or by leaving a message on my facebook page! 


SERENA KISSES :)